You can use lots of different equipment in the studio. But which equipment is best for your project? Do you choose to put on a flash or go for a lamp after all? What backgrounds do you need? Of course, we understand that choosing studio equipment is not always easy. That's why we shine some light on this problem, so you always have the right equipment in the studio.
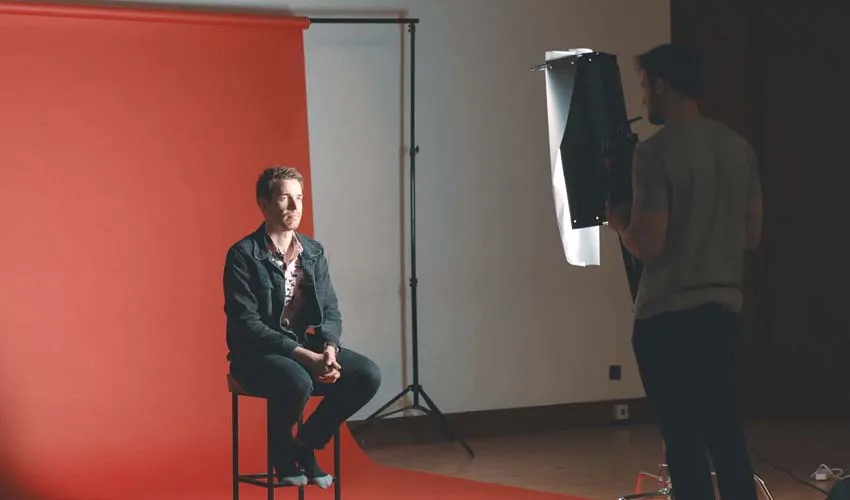
Continuous light| Flash lighting | Which studio flash do I need? | Which studio lamp do I need? | Special lighting | Backgrounds | Light shapers
You won't get far without light. Therefore, it is important to think about what kind of light you want to use in your studio shoot. This can be a flash or continuous light. There are both advantages and disadvantages to using these lights. We explain the main differences below.
Continuous light refers to lamps. These light up your subject all the time. The greatest advantage of this is, you can immediately see the light's effect on the subject. If you move the lamp, you will immediately see the effect it has. Then, if that's to your liking, you can start selecting the right settings for the camera. You may choose to use a light meter now to determine the ideal brightness and its settings. Then you can go right on taking pictures.
In general, daylight lamps are most commonly used in photography, but warmer light can also be used. Colour temperature is adjustable in many LED lamps. You turn the knob and immediately see how hot or cold the light is going to be in the picture. Not only the light, but the lamp itself can also get hot. Therefore, pay close attention when working with models, for example. Over time, the hot lamp can be annoying for the model, but also for you as a photographer, because you really don't want to see sweat droplets on your model's face. By the way, LED bulbs generate a lot less heat than other types of bulbs.
Continuous light is suitable for more stationary subjects, such as products or food. Continuous light also comes in handy when photographing flash-sensitive subjects, such as newborn children or (domestic) animals. Of course, continuous light is the only option if you're going to be filming in the studio. At the bottom of this page, we have an additional piece on special lighting for filmmakers, which you might also find useful as a photographer.
For flash lighting, a reportage flash or studio flash can be used. While the benefits of a flash generally apply to both, for now we will only focus on flashes for studio use.
The biggest advantage of a flash is that they have much more power than a bulb. So you get more light on your subject. Because the light is bright and short, you can freeze movements with it.
Most studio flash units are equipped with a model light (or set light). This model light helps with flash positioning and aiming, but the final result of the flash (strength) will still only be visible in the photograph. This makes the use of flash light a little more challenging for the novice studio photographer.
We prefer to use a flash in portrait photography, (fashion) shoots with models and studio setups where fast movements occur.
There is a huge range of different types of studio flashes available in different price ranges. Before you make a choice, it is helpful to ask yourself what you are going to use the flash for. What kind of light do you want and what requirements should the flash meet, so you can take the picture you want?
It is useful to first look at the power of the flash. This is expressed in watts per second and this also indicates what the light output will be. This light output can usually be adjusted in large or small increments, depending on what you need. The guide number indicates the amount of flash. The higher it is, the more light the flash will produce.
The flash duration and the recycle time (recharge time) indicate how fast and how often you can flash in succession. This is useful to keep in mind if you're going to do a photo shoot with a lot of fast movements. Then you want to be able to capture these in quick succession.
We have selected three flashes for beginning studio photographers. Here we considered both ease of use, and the purchase price. This will give you a good flash and help you learn how to use flashes quickly. The Godox AD200 Pro already leans a bit more in the direction for somewhat advanced photographers, but it is very easy to use.
The three flash units are true studio workhorses. They come with more features and give you more control over the settings. So you have the right flash for every situation. The possibilities are almost endless, and these filters will take your photography to an even higher level.
As with flash units, it is important to first ask yourself what exactly you want to do with them. What kind of light do you want? Is this daylight or warm light? Maybe it's a combination, and you're better off with a bicolour LED light. Do you prefer working with harsh or soft light? Then it is important to use light shapers. There is more written about that here.
The power of the lamp is usually expressed in Watts. This does not necessarily say anything about the light output, as an LED bulb, for example, produces much more light with fewer watts than a coil or incandescent bulb. The power of light is often expressed in Lux or Lumen. The difference between the two is explained in our Studio ABC. In general, you want a higher light output with larger subjects or when the distance between the lamp and the subject is large. Choose a dimmable lamp to alternate the light output.
LED lights are becoming more prevalent in studios because of the great flexibility they bring. The change of colour temperature (sometimes even different colours), stepless dimming, non-heating and high light output with little consumption makes them an excellent choice for the studio.
These LED lights from LedGo give the beginner a lot of flexibility, so you can go either way with them. As multiple lamps often give better lighting, we have also selected two sets that will get you ready to get started in one go.
These lamps are a lot larger and also have a much higher light output. They offer lots of flexibility and will provide the studio with beautiful light. These are suitable for photographers as well as the filmmakers working in the studio. The Nanlite Forza is available in several versions with different wattages. With several of these lamps, you can easily create the ideal lighting arrangement.
To create fun effects in the studio, you can use one of these in addition to your standard lights. LED strips or 'Tube lights' are narrow tubes filled with LEDs. These are adjustable in strength, but the colour is also adjustable across the colour spectrum. They are also very handy if you have limited space. Litra's very compact lamp can be tucked between or hidden behind anything. Useful for effects, but also for extra exposure in those tricky spots.
Basically, there are three different types of background systems available. Wall mounted, on stands and a fully collapsible backdrop. Which background system is most suitable for you?
If you have your own studio where you often work with backgrounds, a wall mount is the best choice. You don't have to set up the whole thing every time, which means you lose a lot less time. Unfortunately, not all of us have our own studio. Therefore, a collapsible set is also very convenient. It consists of two tripods and a crossbar to which the background is attached. Would you rather be able to work even faster and transport less stuff? Then a foldable background is ideal. This will be ready in seconds. So you can start photographing straight away.
These flexible backgrounds have the great advantage of being quick to erect, but also of being less likely to have wrinkles or creases in the canvas due to the high tension on the canvas. A paper background or cloth can get dirty faster and thus will need to be replaced sooner. If you opt for a folding background, though, the surface area is often more limited. So if you want a large background, go for a different setup.
A paper background is a lot faster and cheaper to replace than a canvas. If it has wrinkles or the paper has become dirty, you can cut them off and continue unrolling the roll. A cloth is a lot harder to keep clean. Therefore, most of the time canvases are really only used as background. You can run the paper rolls across the floor to extend the same colour all the way to the bottom of your photo. So your model also looks great on the same colour base and background.
Do you use mainly one colour and only as a background? Then cloth is right for you. Would you like to be able to alternate and take photos where the background continues across the floor? Then we recommend choosing a paper background.
A light shaper can actually be described as a photographer's tool. There are all kinds of light shapers. Examples include soft boxes and octa boxes, reflectors, umbrellas, beauty dishes, grids and snoots. Each type shapes the light coming out of your studio strobes or lights in its own way. Check out the light shapers and exposures page for a more detailed explanation about which light shaper is suitable for you!
Would you like more equipment tips? Then go to the musthaves page. Or would you like to read more about taking photos in the studio? Then read these eleven tips for studio photography.