
• Photo cameras
  • Lenses
  • Tripod
  • Video Cameras
  • Bags
  • Studio
  • Image editing
  • Binoculars
  • Accessories
  • Promotions
  • Canon
  • Sony
  • Nikon
  • Panasonic
  • Fujifilm
  • Sigma
  • DJI
  • Tamron
  • OM SYSTEM
  • Epson
  • All brands
  • Popular Sony Cameras
  • sony-a7v-1.jpg

    Sony A7 V

  • sony-a6700-body_1.jpg

    Sony A6700 body

  • 12311310_1.jpg

    Sony Cybershot DSC-RX100 mark VII

  • Popular Sony Lenses
  • SONY-FE-24-70MM-F2.8-GM-II-1.jpg

    Sony FE 24-70mm F/2.8 GM II

  • SONY-FE-24-105MM-F4.0G-OSS-1.jpg

    Sony FE 24-105mm F4 G OSS E-Mount

  • SONY-FE-50MM-F1.8-1.jpg

    Sony 50mm F1.8 E-Mount Full Frame

  • Popular Nikon Cameras
  • Nikon-Z8_1.jpg

    Nikon Z8 body

  • nikon-z6-iii-1.jpg

    Nikon Z6 III

  • nikon-zf_1.jpg

    Nikon ZF

  • Popular Nikon Lenses
  • Nikon Z 24-70mm F28 S-line Nikkor 1.jpg

    Nikkor Z 24-70mm F2.8 S

  • Nikon-Z-70-200mm-F18-S-line-Nikkor-1.jpg

    Nikon Z 70-200mm F/2.8 S-line Nikkor

  • Nikon-Z-135mm-F1.8-1.jpg

    Nikon Z 135mm F/1.8 S-line Plena

  • Popular Panasonic Cameras
  • panasonic-g9ii-1.jpg

    Panasonic LUMIX DC-G9II

  • panasonic_lumix_S52X-1.jpg

    Panasonic Lumix DC-S5IIX Body

  • panasonic_lumix_s5_m2_body.jpg

    Panasonic Lumix DC-S5II body

  • Popular Panasonic Lenses
  • 12289260_1.jpg

    Panasonic 24-105mm F4.0 L-Mount

  • panasonic-lumixs-50mm-f18_1.jpg

    Panasonic Lumix S 50 mm F/1.8

  • 12217412_1.jpg

    Panasonic Lumix G Vario 100-300mm F4-5.6 II O.I.S.

  • Popular Fujifilm Cameras
  • fujifilm_x-t5_zwart-1.jpg

    Fujifilm X-T5 Body Black

  • Fujifilm-X-E5-zwart-1.jpg

    Fujifilm X-E5 black

  • fujifilm-x100vi-silver-1.jpg

    Fujifilm X100VI silver

  • Popular Fujifilm Lenses
  • Fujifilm_30700_foto1.jpg

    Fujifilm XF 70-300mm F/4.0-5.6 R LM OIS WR

  • 11024042_32426.jpg

    Fujinon XF 16-55mm f/2.8 R LM WR

  • Fujifilm_XF33mm_F14_RWR_foto1.jpg

    Fujifilm XF 33mm F/1.4 R WR

  • Popular Sigma wide angle lenses
  • sigma-24-70-f2.8-dgdnii-art-lens-1.jpg

    SIGMA 24-70mm F2.8 DG DN II Art Sony E-mount

  • Sigma-18-50-E_1.jpg

    Sigma 18-50mm F/2.8 DC DN Contemporary Sony E

  • Popular Sigma macro lenses
  • Sigma_105mm_F2.8_1_2.jpg

    Sigma 105mm F/2.8 DG DN Macro ART Sony FE

  • Popular Sigma telephoto lenses
  • 12201072_1.jpg

    Sigma 150-600mm F/5-6.3 DG OS HSM Contemporary Canon EF

  • Sigma_70_200_2.8_1.jpg

    Sigma 70-200mm F/2.8 DG DN OS Sports Sony FE-mount

  • Popular DJI Drones
  • DJI-Mini-5-Pro-Fly-More-Combo-Smart-Controller-Cleaning-Kit_1.1.jpg

    DJI Mini 5 Pro Fly More Combo + Smart Controller & Cleaning Kit

  • 12508293_1.jpg

    DJI Air 3S Fly More Combo + RC 2 Remote Controller

  • Popular DJI action cameras
  • dji-osmo-action-6-adventure-combo-1.webp

    DJI Osmo Action 6 - Adventure Combo

  • osmo pocket4-in the box 2.jpg

    DJI Osmo Pocket 4 Creator Combo

  • Popular DJI Stabilisers
  • dji-rs-5-combo_12.jpg

    DJI RS 5 Combo

  • DJI-RS-4-Mini-1.jpg

    DJI RS 4 Mini Combo

  • Popular Tamron wide angle lenses
  • 12308793_1.jpg

    Tamron 17-28mm F/2.8 Di III RXD Sony FE

  • Tamron-28-75mm-F2.8-Di-III-VXD-G2_2.jpg

    Tamron 28-75mm F/2.8 Di III VXD G2 Sony FE

  • Popular Tamron macro lenses
  • Tamron-20mm-F28-Di-III-OSD.jpg

    Tamron 20mm F/2.8 Di III OSD Sony FE

  • Popular Tamron telephoto lenses
  • Tamron 28-200mm F2.8-5.6 Di III RXD_1.jpg

    Tamron 28-200mm F/2.8-5.6 Di III RXD Sony FE

  • 12425774-1.jpg

    Tamron 50-400mm F/4.5-6.3 Di III VC VXD Sony FE

  • Popular Olympus Cameras
  • 12481096_1.jpg

    OM SYSTEM OM-1 mark II body

  • OMSystem_Tough_TG7_rood_foto1.jpg

    OM SYSTEM Tough TG-7 - Red

  • Olympus-E-M10-IV-zilver_1.jpg

    Olympus OM-D E-M10 Mark IV Silver

  • Popular Olympus Lenses
  • om-system-mzuiko-12-40mm_1.jpg

    OM SYSTEM MFT 12-40 mm F/2.8 PRO II

  • 11011001_24500.jpg

    Olympus M.Zuiko Digital ED 60mm F2.8 Macro Black

  • Olympus_MFT_14-150mm_f40-56II_zwartED_M.JPG

    Olympus M.Zuiko Digital 14-150mm F4.0-5.6 II Black

  • Popular Epson printers
  • Epson-EcoTank-ET-8550_1.jpg

    Epson EcoTank ET-8550 All-in-one A3+ Photo Printer

  • 12364673_1.jpg

    Epson EcoTank ET-8500 All-in-one Photo Printer

  • 12333395.jpg

    Epson SureColor SC-P700 A3+ Photo Printer

  • Popular Epson scanners
  • 12171706_1.jpg

    Epson Perfection V600 Photo

  • 12203118.jpg

    Epson Perfection V850 Pro

  • 12447712_1.jpg

    Epson Perfection V39II Scanner

  • Nature photography
  • City photography
  • Model photography
  • Action photography
  • Reportage photography
  • Studio photography
  • Videography
  • Techniques

How do I adjust binoculars?

Your new binoculars have arrived! Now, of course, you want to use them as soon and as well as possible. We would like to get you started with our step-by-step guide to help you adjust your binoculars easily. Of course, we also have a few tips for when you go out with your binoculars, as well as how to maintain them.

What parts do you adjust?

  • The lenses on the front of the binoculars are the objective lenses.
  • The bridge sits the middle of the binoculars, with this you determine the distance (fold) between the eyepieces.
  • The Eyepieces, these are on the back of the binoculars, and this is how you look at them.
  • The eyecups are the rubber rings that are attached to the eyepieces.
  • The diopter wheel, this is used to finalise focusing. If you wear glasses or lenses, chances are you do not need to adjust it.
  • The focusing wheel, this is the last part of the binoculars and also the most commonly used. It is located in the centre of the binoculars.

This is how to adjust your binoculars

Step 1: Adjusting the bridge

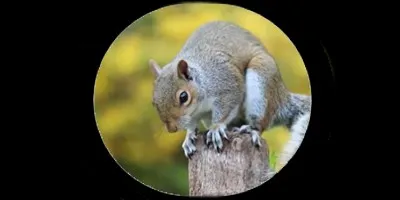
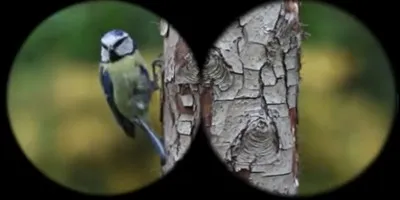
When you start adjusting your binoculars, start with the bridge. You need to make sure that the width, or fold, of the binoculars is comfortable for your eyes. The first way to do this is to set the binoculars to their widest setting. Next, do you see two circles? Then the crease should be smaller and the bridge narrower. Slowly keep adjusting the bridge until you see only one circle. If you have found the point where only one circle is visible, then the bridge is properly adjusted.
verrekijker-afstellen-1cirkel_3.jpg
A properly adjusted bridge shows one circle
verrekijker-afstellen-2cirkel.jpg
If the bridge is not properly adjusted, you will see two circles

Step 2: The spacing of the eyecups

At the back of binoculars are the eyepieces with eyecups on them. Eyepieces allow you to hold the binoculars comfortably against your face, they block out light and determine the distance between the eyepieces and your eyes. Do you wear glasses? Then this step is easily done, since your glasses already create the necessary distance, you don't need even more distance to the Eyepieces. You can close the eyecups completely.

Don't wear glasses? Then twist off the eyecups completely. Look through the binoculars, is the image sharp and clear? Perfect, then this mode is fine for you. Is the image not nice and round or do you see black spots? Then turn the caps in slightly and look again. Play with the distance and rotate small bits each time until you have a perfectly sharp and circle-free image. Have you found this point? Then the eyecups are set.

verrekijker-afstellen-oogdoppenendioptrie_n.jpg

Step 3: Focusing the diopter

Almost everyone has a small deviation in strengths between the two eyes. In everyday life, you don't notice much of this. Still, when using binoculars, you will notice that the image is not quite sharp if you do not adjust the diopter. Chances are your eyes will compensate for this, but it can be tiring for your eyes. Therefore, in this step, we are going to explain how to adjust the diopter properly.

For this step, it is important that you can see about 12 metres far. Look at your surroundings and then find a landmark about 12 metres away, it would be best if this is a high-contrast object, think of a road sign or letters.

Time to focus. Close your right eye and look only with your left. Find the landmark. Turn the diopter wheel until the image in front of your left eye is razor-sharp and crystal clear. Then close your left eye and open your right eye. Find the same landmark and turn the diopter wheel again until this image is also razor-sharp and crystal clear. Can you see everything perfectly with this eye too? Then now open both eyes and enjoy your sublimely adjusted binoculars.

One last tip for adjusting the diopter: Some binoculars do not allow you to fix the setting. In that case, write down or memorise the diopter settings. That will benefit you the next time you go out.

Step 4: Focus on the object

Finally, use the focus wheel to focus on the object you want to look at. This way of focusing is easy and quick. Always take some time for this. Otherwise your eyes will compensate for the blur and get tired quickly.

verrekijker-afstellen-scherptstellenobject.jpg

Using your binoculars

After setting up your binoculars, you can start watching. To have and keep as much fun as possible with your binoculars, we would like to give you a few more Tips.

Tip 1: Be kind to your binoculars

Binoculars are a portable precision instrument that can last a lifetime. Therefore, your binoculars deserve a little extra love and attention. Of course, Binoculars are made to be super sturdy and robust. But unfortunately, they are not indestructible. A sturdy strap allows you to hang the binoculars safely around your neck and reduce the risk of damage. After use, you can store the binoculars in a case.

Tip 2: Don't look through your binoculars while walking

Walking while looking through binoculars is very dangerous. It is therefore preferable not to do so. Distances are difficult to estimate and you risk overlooking obstacles.

Tip 3: Try using a tripod

When using your binoculars for long periods of time, your arms can get tired. Keeping your arms still becomes more difficult as a result. Fortunately, many binoculars can be used with a tripod, allowing you to look at one object for longer without tired arms. Some binoculars have a direct connection for this, while others need an adapter.

verrekijker-afstellen-statief_n.jpg

Tip 4: Choose the right magnification

You have binoculars with different magnifications. It is wise to choose a magnification to match the object you want to view. An 8x magnification is generally pleasant and bright, and the field of view is wider. This has the advantage that vibrations from your hands are less noticeable. Because of their higher brightness and stability, 8x binoculars are ideal for active viewing and all-round use.

With 10x binoculars, the field of view becomes smaller but the object you are looking at appears even closer. This does make the image more susceptible to shaking. It is therefore important to stabilise yourself, use a tripod, for instance, or sit comfortably at a table. A bit less light comes out of the binoculars than with an 8x so at dusk your image will be a bit darker.

Maintaining your binoculars

With regular use, binoculars can get dirty. That is why it is important to maintain your binoculars properly. This will prevent blurry images, scratches and damage. Maintenance does not take much time and is easy to do.

Keep the lenses clean

Get into the habit of cleaning the lenses and eyepieces before storing the binoculars. First, remove the grains of dust and sand. To do this, hold the lens that needs cleaning down, use a brush or lens pen to gently brush away the grains. The grains will fall down and thus away from the lens. Afterwards, check the lenses to make sure all the grains are really gone, this can be done with a magnifying glass if necessary. Are your binoculars waterproof? Then you can also rinse the lenses under the tap with lukewarm water. Note: never use a (lens) cloth for this. Because then you will rub the grains over the coating or lens and this will cause tiny scratches and damage.

To clean and degrease the Lenses, you can use a microfibre cloth and special cleaning fluid. The microfibre cloth usually comes with binoculars. In addition, the use of a cleaning fluid is recommended. This will degrease and clean the lens without damaging the coating. Put one drop of cleaning product on the microfibre cloth and make a gentle circular motion. Do not rub too hard or in one back-and-forth motion. Is the Lens clear and clean again? Then wipe the lens with a dry microfibre cloth until all the residue is gone and the lens is completely clean.

Always use the right products for cleaning Lenses. Paper handkerchiefs or kitchen paper contain rough wood fibres that can damage Lenses beyond repair. Household agents such as acetone and washing-up liquid corrode the coating. Therefore, use only substances and agents specifically intended for cleaning binoculars, such as the Zeiss Lens cleaning kit.

verrekijker-afstellen-zeislenscleaning.jpg

Moisture and sunlight

Many binoculars are splash-proof or fully waterproof, but even then it is important to thoroughly dry your binoculars when they get wet. You do this by dabbing the binoculars dry with a microfibre cloth. Then let the binoculars dry quietly at room temperature for a few days without protective caps. Do not put the binoculars in direct sunlight! This can cause condensation.

Even when dry, don't leave your binoculars in the sun (for long periods of time). The (rubber) casing may get (hair) cracks and you run the risk of condensation. Absolutely do not leave the binoculars in the car either. The car dashboard can reach temperatures of 40 to 50 degrees behind glass in summer.